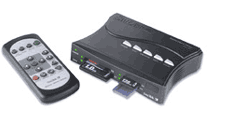


The SanDisk Digital Photo Viewer (DPV) is probably one of the best new gadgets around that you can use without the need for a PC, laptop or software.
Now you can view your digital photographs on a television set. . .as long as your digital camera uses a memory card or stick . It’s so easy to set up and use, even those who aren’t tech-savvy (like your parents) can get it up and running in no time.
Here’s how it works: Take photographs with your digital camera (resolution can be up to 6 megapixels), then select a television to hook the DPV up to; one with an S-Video input is best. Next, place the DPV on top of the TV – it’s small and lightweight (about the size of a portable CD player) and connect the S-Video cable to the DPV and television (if you don’t have S-Video, connect the included composite video cable to the video input). Then, connect the included AC adapter to the DPV and plug it into an electrical outlet. Pop your digital camera’s Memory Stick, or CompactFlash (Type I or II), SmartMedia, SD or MultiMedia card into the appropriate slot on the front of the DPV. Turn on the DPV with the included remote control and you’re ready to roll (yes, batteries are included).
A SanDisk 8MB CompactFlash card with 22 color photographs on it was used for this review. It took less than five minutes to set up the DPV using the S-Video input on a 42-inch television (the bigger the television, the bigger the photographs will appear). Once the unit was turned on with the CompactFlash card inserted, the first of the photographs appeared, a ship model, and showed the details of the model very well at such a large size.
The remote offers several options:
Play/Slide Show – Each photograph appears for however many seconds selected (from 0-60), then goes to the next photograph; you can also pause the slide show.
Preview – Probably the nicest feature, this shows the first photograph on the upper left side of the television screen, then produces “thumbnails” of six photographs along the right and bottom. The one appearing on the screen has a red line around it; use the up, down, left or right arrow buttons to go to the other photographs, then push the menu/select button to view the selected photograph. To go to the next set of photographs/thumbnails, use the next or previous buttons.
Zoom – Once a photograph is selected, zoom in or out; the only caveat is you have to zoom back to the original size before using any of the other buttons on the remote
Rotate – The selected photograph can be rotated right, left, or 360 degrees.
Delete – Delete a photograph from the card or stick (but you can’t recover it, so be careful!
Menu/Select – Select your preferred language (English, French, Spanish, German, Italian, Chinese and Japanese); switch between NTSC and PAL formats
The DPV is one of the easiest ways to share photographs with family and friends who don’t own a computer or at a gathering so that everyone can see the photographs on a large television screen versus a smaller computer screen. Since the DPV is so small, it’s easy to take on vacations, business or other trips – no more messy slide shows with a projector, slide carousel and all those slides to deal with!
Plus, since the DPV accepts several kinds of media, you can share or exchange photographs with just about anyone. The price can’t be beat – it’s $79.99 and comes with a two-year warranty.
SanDisk Digital Photo Viewer
Rating: 5 out of 5 stars
Price: $79.99
Company: SanDisk
800-977-5427
J.A. Hitchcock is a regular contributor to Compute Me. Visit her web site at jahitchcock.com.